Note: |
This form only requires completing if you are using barcodes for sales or stock tracking. When you have finished using this form, you will be returned to the 'Stock Item Details' form where you must save the entries that you have made. |
From the 'Stock Item Details' form of the required record click on ''Sub Menu' > 'Barcodes':

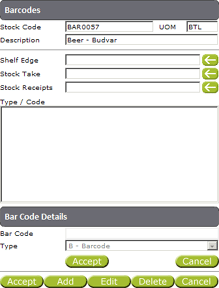
The 'Barcodes' form (shown below) will be revealed and should be completed as described here.

Click on 'Add' at the bottom of the form.
In the 'Barcode' field, enter a barcode number for this item (barcode numbers can be typed in, or the item can be scanned if there is a barcode scanner attached to the computer).
In the 'Type' field, select a barcode type from the drop down list.
Click on the 'Accept' button just below the 'Type' field for the barcode to be placed in the 'Type/Code' field.
Select the correct barcode number in the 'Type/Code' field.
Click on 'Edit' at the bottom of the form.
The selected barcode number will be placed back into the 'Barcode' field, where it can be changed.
Click on the 'Accept' button just below the 'Type' field for the edited barcode to be placed back in the 'Type/Code' field.
Select the correct barcode number in the 'Type/Code' field.
Click on 'Delete' at the bottom of the form.
A message will appear asking you to confirm the deletion. Click on 'Delete' to continue.
The selected barcode will be deleted.
Select the correct barcode number in the 'Type/Code' field.
Depending on the type of label you require, click on the arrow against 'Shelf Edge', 'Stock Take', or 'Stock Receipts'.
The selected barcode number will be placed against the selected label type.
Printing barcode labels is discussed in 'Barcode Label Printing'.
Click on 'Accept' at the bottom left of the form to be returned to the 'Stock Item Details' form:
![]()